


Last time, I posted a number of lovely 1920s portraits and asked you to take a look and be inspired, so that in this post I can show you how you can take your very own 1920s-style photos.
*Note: Nothing about this tutorial is historically accurate, in that we won’t be taking photos with cameras from the 1920s, or developing real film in dark rooms. Instead, this tutorial uses a very basic setup, and your digital camera. You do *not* need to have a high-end camera for this!
How to Take and Make 1920s-style Costume Photos
What you will need:
- A computer with an internet connection
- A digital camera
of any kind
- A tripod
- A piece of black muslin (or any color)
- A piece of large white foamboard
- A chair or stool (optional)
- A room with a window
We’ll be starting this tutorial at the point where you have already done your hair and makeup. These things I leave to you – study 1920s portraits to help you get the “look.” Be sure to wear enough makeup
– I say this because in the 20s, heavy makeup on film was the norm. Don’t forget the eyeshadow and the red lipstick.
Step 1 – Set Up
This set up is a simple and extremely effective way to take beautiful photos of just about anything – you, your costumes, your dog, you name it.
Hang your backdrop up so that it is considerably higher than your head, and falls to the floor. If you are taking full-body shots, such as a costume on a dress form, let the backdrop fabric extend down onto the floor. You don’t need special “backdrop fabric,” just a wide width of yardage from any fabric store.
 |
| Click to enlarge |
Hang your backdrop next to a window. It doesn’t matter what side the window is on, so long as it’s off to one side, so it is perpendicular to your backdrop. You *do not* want direct sunlight coming in through the window. If your window has sheer curtains, draw them – this diffuses the light, making for soft, dreamy photos with soft shadows.
 |
| Here are some general notes for the setup, as seen through the camera |
Next, set up your tripod, and if you like, place a chair with your piece of white foam board propped up on the opposite side from your window. This piece of foam board acts as a reflector and bounces the light from the window back onto the subject, illuminating shadows that may be too dark. White is best – a colored board will bounce colored light back onto your face (could be fun later, but superfluous for this tutorial)
Step 2 – Snap Your Photos
If you’re taking a photo of a friend, snap away. If you’re taking a photo of yourself, use the self timer and have at it. Be sure to take enough photos, not just one! Also, take photos normally, not in sepia or black and white – you will change this later.

While you’re taking photos, think about your pose. How did ladies in the 1920s pose in front of the camera? You may notice that they have enormous eyes and small lips – this is not because women looked any different back then than they do today, but instead it is how the camera perceives and flattens space. If you lower your chin and tilt your head forward, look out the top of your eyes, and keep your lips closed, the camera will make your eyes look huge and your lips look small.
Step 3 – Be Creative with Picnik.com
Upload the photos onto your computer and pick out one, or a couple, that you like. Then go to www.picnik.com, click “get started now,” and upload your photo. (I chose Picnik.com because it’s accessible to everyone, very easy to use, and gives fantastic results).
You’re only steps away from a beautiful 1920s-style photo. There are just a couple tools you will need, all under the “Create” tab at the top of the Picnik website. Click on it, and you will see a number of toys on the left side – click “effects” at the top. You will see options like “black and white,” “sepia,” “boost,” etc. appear.
The first photo we’ll do it a color-less sepia-toned photo. I will show you how to do a photo that looks like it’s been colorized later. Let’s break it down into additional steps:
 |
| This is my original photo, from the camera. |
Step A –
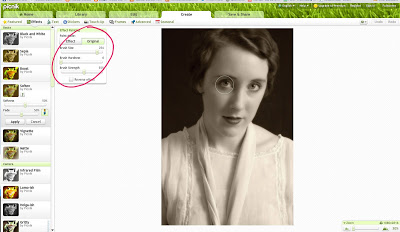
Choose the “Black and White” filter on the left side. Click “Apply.” For this particular instance, you want the photo to be fully black and white.

Step B –
Choose the “Sepia” filter. As you can see, it’s *very* sepia, which was seen in the 1920s, but looks a little cheesy today. Move the slider under “Fade” to about half-way. Click “Apply.”
 |
| A little Sepia goes a long ways. |
Step C –
Click on “Soften” (third down on the left). You will see the whole photo go blurry. Make it as blurry as you like, but do not go any sharper than 50%. Leave “Fade” at 50% too.
You will see a toolbox to the right of the effects menu, with “brush size,” etc. in it. You will use this to gently erase the softness away from select areas of your photo – the parts in focus should be the important bits, such as eyes and lips. Use a large brush at about 50% strength, and click on the areas in the photo you want to bring back into focus. When you’re done, click “Apply.”
*Note – don’t skip the Soft Focus step, it’s what makes photos look old! Soft Focus was used for Old Hollywood portraits all the way up through the 1960s. It is extremely flattering and romantic, and draws attention to the areas in focus, such as the eyes. Photographers has specially-made soft focus lenses just for this, or they rubbed vaseline on their lenses to get the hazy, dreamy look.
 |
| The toolbox under the “Soften” effect. Try a big brush size, and half-strength. Don’t worry about Brush Hardness. |
Step D –
Last step! Select “Vignette” from the effects menu. Play with the settings to get the look you like – I go for a black vignette at about 30% fade. If you’d prefer a white, cloudy look, try “Matte” underneath.

Save the photo back onto your computer by selecting the “Save & Share” tab at the top (right side).
And that’s it!
 |
| Before and After |
Want to try a colorized photo? Okay…
Colorized 1920s-style Photo
 |
| Original on the left, what we’ll end up with on the right. |
Step 1
Take your photo of choice into Picnik.com, same Effects menu as above. This time, you’re not going to turn the photo black and white, but instead, just select “Sepia” first. Set “Fade” to about 50%. You will see the colors lose their saturation, and everything takes on a warm feel.
 |
| Add Sepia over the top of the color photo, 50% strength. |
Step 2
Apply the “Soften” filter same as above, and paint select areas back into sharpness – remember, eyes, mouth, front of hair, whatever is important. Here are some tips:
 |
| Click to enlarge and see the text |
Step 3
Add vignette. Save. You’re done! 🙂

Here’s the final photo:

If you have questions, I am happy to answer them. Also, as a general note, this basic setup can be used for photographing your costumes. Remember: backdrop + window light from the side, and you can get great results from any quality of digital camera.
I hope you found this a fun and helpful tutorial. I’d love to see any photos you create using these techniques, please leave links in the comments 🙂


23 Comments
MrsC (Maryanne)
June 29, 2011 at 10:03 PMThat's so cool, thanks Lauren. I'm great at posing subjects for photos but struggle with light, this has been really useful on many levels!
Lauren R
June 29, 2011 at 10:07 PMLight is one of the hardest things – I fail miserably with artificial lighting, even with diagrams to follow, but the natural light seems to always work, so long as it's diffused like this. I'm glad I could be of help! Mr. C taught me this set-up and I've been using it for just about all my costume photos, in my sewing loft, ever since 🙂
AvaTrimble
June 29, 2011 at 11:25 PMOhhhh, so cool! Do you have any tips on how to achieve the slightly different 40s and 50s style(s) of photography? I love this stuff, but I can't pull off a 1920s look to save my life!
Maggie
June 30, 2011 at 2:50 AMLove that first pic of you! Fun!
Lady Rebecca
June 30, 2011 at 9:17 AMThat was a really cool tutorial – thanks! I was impatient to try out the photo editing, so I did one of each type on an older photo of me, and it came out really cool.
Here they are:
http://img.photobucket.com/albums/v723/bgirl781/me2pt0.jpg
http://img.photobucket.com/albums/v723/bgirl781/me2pt2.jpg
I'll have to try out the actual photo taking in the future.
Isis
June 30, 2011 at 5:48 PMAbsolutely great tutorial! Lots of goo dpointers I'll definitely use! Thank you!
Henryk MCMLXVI
June 30, 2011 at 5:50 PMThank you very much for the tips! Even if I have a dress of 1700, I'll try it anyway.
Henryk MCMLXVI
June 30, 2011 at 5:52 PMhttp://www.facebook.com/media/set/?set=a.198282483555225.72311.100001204245325&l=6a39bbf69b
Lauren R
June 30, 2011 at 6:14 PMI'm so glad you guys found this useful! I love the photos you worked on, Rebecca and Henryk!
Ava, I do plan on doing other tutorials like this for other decades, the 50s and 60s definitely, and the 40s (it's a bit harder, but I'll give it a go – lots of artificial light was used in the 40s, makes it more difficult), and also Victorian-era, which is similar to the 20s.
Henryk MCMLXVI
June 30, 2011 at 7:57 PMLorean, I've seen the pictures of your creations and I must say that You are really an artist!! What a pity that I live so far away, otherwise I would ask You to give me a new suit of 700. The blue dress I'm wearing now is old:
http://youtu.be/gXT4pb_N5K8
Angela
July 1, 2011 at 12:34 AMOh my gosh Lauren this is absolutely fabulous! Any suggestions for folks of color? I was thinking about doing something like this myself and the black grounds are so dramatic but I wonder if that will work as my hair is dark, too. Mmmmm. In any case of love this tutorial. Thank you so much. Thanks for visiting my site to see my 20's photos. Cheers
Angela
July 1, 2011 at 12:35 AMThis comment has been removed by the author.
Jenni
July 1, 2011 at 1:08 AMLauren, Wow…what an inspiration! So inspirational, in fact, that I put up a post about a 1920's dress that I recently made, and played around with a few photographs of me in it. I linked to you, of course. Thanks! You can check it out here:
http://livingwithjane.blogspot.com/2011/06/green-1920s-gown-and-photoshop.html
Lauren R
July 1, 2011 at 1:28 AMAngela – you could try a grey backdrop, they are universally flattering. You could also try a light color, maybe not white, but something that is on the lighter side. The lighting, with the window to the side, will still work and great absolutely beautiful skin tones and soft shadows. The photo of your grandfather is beautiful, and good inspiration 🙂 I like to try to re-create photos I find inspiring, same pose and light, hair, makeup, etc. It's a fun little Sunday afternoon project 🙂
Jenni, you've definitely got it! Beautiful photos!!
AvaTrimble
July 4, 2011 at 6:13 AMOh, yay, more period photo tutorials! I await them eagerly. Thanks!
Sparrow
July 23, 2011 at 6:23 PMThank you! This is wonderful information. I can't wait to try it. 🙂
Jennifer
July 27, 2011 at 12:44 PMThis is really very nice information about the 1920's costumes
photo.I really like this information very much and it will be very useful for me.
Lauren Hairston
August 2, 2011 at 4:37 PMWow–this is really cool! Thanks for the detailed information!
Lauren R
August 2, 2011 at 6:52 PMThanks everyone – I hope you find this tutorial useful. It's a fun one, and can be fiddled around with for other effects. 🙂
Anonymous
July 14, 2012 at 8:50 PMThank you! This is wonderful information. I can't wait to try it. we are having a 1920s party and i will be photogrphing the guest
Emily Jenkins
October 26, 2012 at 4:40 PMHi Lauren, What are you wearing in this photo shoot? I really love the simplicity of it, and I'm dreadfully curious. Do you have other photos of the dress/blouse you're wearing?
Ségolène
July 16, 2013 at 7:10 AMThanks a lot for your advices ! Picnik doesn't exist anymore, so I used Pixlr, and the result is great. You can see the pictures here : http://talonsaiguillesetvieillesdentelles.blogspot.fr/2013/07/annees-folles.html (in french…)
Kelly
July 21, 2014 at 12:02 AMCould you do something like this to make a carte de viste type photot?