

Earlier this week I espied on HalloweenCostumes.com a “Marie Antoinette” wig that looked surprisingly good. My criteria for judging this goodness were the overall shape, color of the hair (it wasn’t WHITE), but most importantly if this wig could form the base upon which to create a really great period styled wig.
Some of you will know that I posted a link to this wig on my Facebook fan page, and it sparked all kinds of discussion about period accuracy, quality versus pricing, “cheaping out,” and if in this particular subject of wiggery, do you really “get what you pay for.” I am one of those who does not believe that you have to pay and arm and a leg to have nice things. I’m also big on the D-I-Y, and I was eager to try out some new tips and tricks I’d picked up since my last adventure in Wig Wrangling.
 |
| Here’s the image from HalloweenCostumes.com website |
Let’s start with the Marie Antoinette Wig fresh out of the bag, then I’ll take you through the “how to” for how I altered it.
The Good
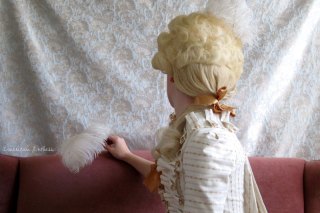
As mentioned above, the overall shape of this wig is pretty nice for 1770s pouf styles. The hair comes up and off the face, with no bangs or ringlets framing the forehead, as is the sad case on almost every “costume wig” I’ve found for 18th c. The curls of this wig are actually quite natural, and it’s easy to fluff the hairstyle up and make it look pretty darn cute within a matter of minutes. It is also easy to create more distinct ringlets just by twirling the hair around your fingers.
 |
| Here it is out of the package, a little fluffing, and I’ve removed the pink bows. |
The Not-So-Good
These things aren’t “bad,” they just need altering. The wig comes with pink satin bows on either side of the head. These are glued on but can be pulled off easily and don’t leave a gap or a mark. Also, there are two ringlet curls hanging down by the ears, which to many people screams “18th century!” but they’re not. You can pin them up into the rest of the hair, or do what I did and just cut them off (but keep them for testing later, if you are going to work on this wig in the following tutorial).
Also, the wig only comes in platinum blonde, and I do not recommend the spray technique for taking the wig to a darker color.

The Eeek!
The wig is not WHITE, like most 18th century costume wigs, but it is very very platinum blonde, and very very shiny. It’s also a color very hard to match with hair extensions, if you are wanting to add more hair to your wig.
The Verdict
With just small alterations and a quick, light mist with an ivory colored spray paint this wig would look awesome and ready-to-go. In its original state, it is the best option I have seen for anybody who wants to dress up in the 18th century style for a costume ball, Halloween party, masque, etc., who is *not* concerned with total historical accuracy and will wear the wig for fun. It’s cute, easy to wear, and at $22.99, an awesome deal. Here’s a bit about the store:
HalloweenCostumes.com also has a fun collection of Victorian costumes that are perfect for “Do-It-Yourself and Do-It-For-Less” costumers . With worldwide shipping, unique costumes, and a firm commitment to customer service, HalloweenCostumes.com is a perfect source for Halloween costumes and accessories that can be worn throughout the year.
For those on the journey of wig-creation of the historical variety, it’s an excellent base from which to work. But how do you get from THIS to THAT?
How to Make an 18th Century Wig from an Affordable Costume Wig
 |
| Yep, it’s the same wig… |
What You Will Need:
- one “Marie Antoinette” wig from HalloweenCostumes.com
- one package of long hair extensions/weave in the lightest blonde you can find
- one can of off-white, or “blonde” spray paint in a satin or matte finish
- needle and white thread
- powder (opt) – talc, corn starch, flour, or baby powder (if you don’t mind the smell)
 |
| Fluff Me Please! And cut off my ears! |
 |
| The side rolls, in the wig before spraying. |
 |
| Curl the weave BEFORE you sew it on, but when you do sew it on, this is what it looks like… |
 |
| Quite a difference in the color of the two hairs, but that will change soon… |
 |
| After spraying – big difference from the picture above |
 |
| The finished wig from the side, but what I didn’t realize is that as the paint dried, it got yellower and yellower – wish it would have stayed this color! |

 |
| Too yellow, so I’ll re-spray it with a whiter, less yellow, spray paint. |


22 Comments
Unknown
March 13, 2011 at 12:19 AMLauren, I love what you've done here. A crapload of purists wouldn't dare go where you have and because of that, they either cannot afford to, or do not have any time left over to attend the event that this sort of thing would really work well at. It isn't appropriate for a museum piece, or for your period wedding, but it really would ROCK a costume party, or work admirably for a stage play. Awesome.
Lauren R
March 13, 2011 at 12:22 AMAw thanks Bob 🙂 You're right, it's definitely not a "pure" thing. I've got my toes wet, though, and now I want to try building a wig, a really accurate one, from scratch, proper Duchess style. Sounds hard…
Barb
March 13, 2011 at 12:49 AMWhat a great, clearly articulated and illustrated tutorial! Clever, clever girl!
Lauren
March 13, 2011 at 3:03 AMIt looks great!
Lindsey
March 13, 2011 at 3:19 AMNeat! I may have to refer back to this at some point…I'd like a 'Marie Antoinette' style wig for my 1860s masquerade ball 'Marie Antoinette' costume. 😉 Thanks for your wonderful posts!
Sandra Brake
March 13, 2011 at 7:54 AMI bought the same wig last year but decided it didn't suit me and gave it to a friend. But I like what you've done with yours. Might have to rethink it and buy another just to see if I can have similar success. Not that I don't have any wigs. I now have two which I'm very happy with but hey you can never have too many.
Steph
March 13, 2011 at 12:51 PMI like it. Now you have me itching to play with 18th cent wigging… heh.
Anonymous
March 13, 2011 at 3:51 PMNice work! It really makes me want to try some wiggery. Is this your best recommendation for a cheap, costume-priced wig? I was thinking of buying the "farm girl" Lacey's wig for a late 1800s Duchess-type look.
Lauren Stowell
March 14, 2011 at 6:02 PMI want to try it out with other colors now too. Rebecca, the "farm girl" wig is the first I ever bought for late 18th c. hair, and it's actually pretty decent, although I ended up destroying mine because I didn't have a clue what I was doing. Maggie W. did an awesome job with hers though, by adding on the hair extension to the back.
Any curl, short wig (with no bangs), would work for this, I think. Now to try it again!
E. Waterman
March 15, 2011 at 4:53 PMRebecca: I used the farm girl wig, and it was a great starter. One tip, though, I sewed a cap over the majority of the wig is horrid, but not all unusable. The "pig tails" are really useful if you take them out of the pigtail form and brush them out, then make the big lovely barrel curls. To assist the look, like Lauren said, I bough 100 percent human hair and sewed it along the bottom so that I could have long curls that hung down. With a little work, it is a GREAT serviceable wig!
Sandra Brake
March 17, 2011 at 11:22 AMI have a Mrs Lovatt wig too that has lots of potential. But I haven't been game to undo the barrel curls yet.
Kirsten S
March 21, 2011 at 2:46 PMI found a wig online that looks like it could potentially be a wonderfully large mass of hair close to the Duchess, I would love your opinion on it!! http://www.costumewigsource.com/lospcuwig.html
It's a little more expensive but the quality is better and Im hoping the hair is less sparce as a result… Let me know what you think!
Lauren Stowell
March 21, 2011 at 9:02 PMKirsten, I do think that wig would work for late-century huge Duchess-style, with a little styling. I would tease the roots around the head and you might need to trim the length in some places. Wrangle away!
Anonymous
January 30, 2012 at 5:29 PMLauren, I caught this on my Facebook Page through the Costumers Manifesto. Awesome work! Fyi, you can also style synthetic hair with a clothing steamer. Since you can concentrate the areas of steam, you may be able to do that part of the styling done after sewing the wefts in, or it may just be easier than boiling the hair! What a great "how to"!
bbhairextensions.com
July 11, 2012 at 10:35 PMMost of us believe that our hair is our crowning glory.
These training seminars has been a great opportunity for the hairstylist.
It will enhance their skills and will make their work efficient thus providing satisfaction to prospective clients.
Long Hair Extensions
Unknown
November 17, 2012 at 8:29 PMYou got a really useful blog I have been here reading for about an hour. I am a newbie and your success is very much an inspiration for me. lace Front wigs
Unknown
May 10, 2013 at 6:24 AMThis comment has been removed by a blog administrator.
Eli
September 30, 2015 at 6:38 AMHi!
I love this tutorial and I really wanna try it for this Halloween! But for me there's an issue that doesn't work (in my case): my hair is VERY dark and all the wigs that I've found online (the one you use and others similar) are blond and I look VERY weird. So I've looked for dark wigs with similar shapes, but I haven't found any. But I found this ones that I think might work for a style similar to the ones from The Duchess film (I think I can add extensions in the back like you did!). The thing is that I'm not so sure… could you take a look at these links ad give me a little fast advice? That would be awesome!
As a matter of fact I wanna use this Halloween wig (whichever I end up buying) as a test since my hair is very very very short (about half inch long XD) and I'll need a proper wig to wear with my 18th century outfits.
This two wigs are similar and are the ones I think I can add extensions to the back:
http://www.amazon.com/Rubies-Lets-Dance-Black-Size/dp/B00CQDDNC6/ref=sr_1_28?ie=UTF8&qid=1443587571&sr=8-28&keywords=marie+antoinette+wig
http://www.amazon.com/Rubies-Costume-Female-Short-Black/dp/B000VAJZIC/ref=sr_1_1?ie=UTF8&qid=1443590851&sr=8-1&keywords=TALK+SHOW+QUEEN+WIG
And I'm not sure if these two can be arranged into something decent:
http://www.amazon.com/Rubies-Costume-Colonial-Lady-Brown/dp/B000LNL1C2/ref=sr_1_7?s=apparel&ie=UTF8&qid=1443590865&sr=1-7&nodeID=7586165011&keywords=victorian+wig
http://www.amazon.com/Marie-Antoinette-Wig-Characters-White/dp/B00FY7KEGY/ref=wl_mb_wl_huc_clickstream_3_dp
Thank you so much! <3
Lauren Stowell
October 1, 2015 at 7:30 AMHi Eli – I think the best of the wigs in your links is the Colonial Lady Wig (http://www.amazon.com/Rubies-Costume-Colonial-Lady-Brown/dp/B000LNL1C2/ref=sr_1_7?s=apparel&ie=UTF8&qid=1443590865&sr=1-7&nodeID=7586165011&keywords=victorian+wig)
So long as you work those long side sausage curls into something more appropriate (tease them and pull the up into the "pouf," or roll them up for the side curls), this one could work really well.
Good luck!
Eli
October 1, 2015 at 4:11 PMYeeeii!!! Thank you so much! I'll be sure to share the results 😉 (if they end up looking good of course!).
Thank you thank you!
reliena
September 19, 2016 at 2:43 AMThis is so great! I too am a huge proponent of using Halloween wigs, fussing them up with extra hair and styling to use in community theatre. I actually have a wonderful tip for you if you happen to have, or wish to acquire, a clothing steamer! If you put your synthetic wigs in curlers or I suppose pin them, then use a steamer on them, it totally sets the curl. No need to do the boiling water dunk! I'm about to style 10 wigs for a production of Les Liaisons Dangereuses, so I am very excited to try this technique of ivory matte spray paint to achieve the powdered look. 🙂
Maja Alofs
March 14, 2017 at 9:12 AMI think you did an awesome job. Very inspiring ! What kind of paintspray can I use…as I have to order it…living in Holland. Many thanks!