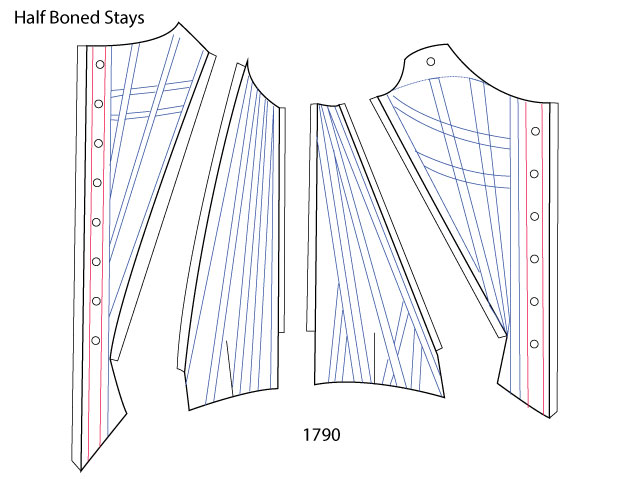
In preparation for making your Simplicity 8162 18th c. stays, you may wish to re-draw the boning pattern.
The pattern comes with an accurate layout for half-boned stays. If you would like to deviate from this, perhaps to add more support or change to a fully boned stays pattern, it’s a very easy alteration.
All you need to do is redraw the boning channels. On my stays I’ve done fully boned and simply drew the pattern I wanted on the interlining layer. It’s as easy as that.
Preparation
On your stays pattern there are “no go zones” where your CF and CB needs to have channels on the edge and opposite side of the lacing holes. You’ll notice in all the patterns I’ve drawn out that this “bone-grommets-bone” pattern is on the front and back pieces. Other “no go zones” are the seam allowances – obviously you don’t want to run your boning channels into the seam allowances. I typically will do one channel right along the seam on either side, parallel to the seam.
Drawing the Pattern
After you’ve marked out your CF and CB “no go zones” and your seam allowance, you can draw whatever pattern you like. Keep your references handy and pay attention to how the boning channels intersect the tabs or curve across the body.
3/8″ channel for 1/4″ wide zip ties
5/8″ channel for 1/2″ wide zip ties
Here are several boning patterns from original stays, in chronological order:


Horizontal Boning?
On many of these layouts you will notice horizontal boning across the bust. This creates more support for the bust, especially larger busts. But how do you stitch this in?
The answer is to create a “pocket,” a separate piece that is applied to the bust area after the vertical boning channels have been stitched into the outer fabric and interlining. I make my pockets of two thin layers of muslin with the horizontal boning channels sewn in, then I tack the entire piece to the interior of the stays.
You can stitch through all layers to secure it, but I usually just secure the pocket to the seam allowance and top edged. Another method for horizontal boning is to stitch linen or cotton tape to the interior to create individual channels. With any of these methods, if you stitch through all layers, be sure to sew the pocket or tapes in *after* you’ve inserted the vertical boning, so you don’t accidentally sew the channels shut!


Once all the boning channels and pockets are sewn in, the interior will be covered with the lining, so don’t worry about it looking messy!
———————————-
Boning channels can be quite creative. Keep your references handy, but don’t be a “slave” to the reference. Think about how different boning directions might affect your body, and don’t be afraid to experiment.
Helpful References:


14 Comments
Carpet cleaning in Epsom
May 16, 2016 at 4:44 AMThis is awesome! Keep up the good work!
Jenerators
July 4, 2016 at 12:03 PMas a beginner historical costumiere (my copies of 8161 and 8162 arrived in today's post) there's one thing I don't understand… Could you please explain WHY it is necessary to add more boning to the bodice of this pattern?
Lauren Stowell
July 4, 2016 at 7:18 PMHi – The bodice calls for boning in the front edges and at the center back seam. This is to keep the edges straight, particularly when stressed by the lacing, and to hold the point at the back waist. Even with the stays I have found this little but of boning to be helpful in keeping the bodice shape.
Lauren Stowell
July 4, 2016 at 7:18 PMThis comment has been removed by the author.
Roupa Royale
September 7, 2016 at 9:47 PMAdding the extra boning gives additional support. The Simplicity pattern as is shows the minimum amount, but it will be less comfortable and fold/wrinkle at the stress points. Adding extra bones distributes the stress and makes the stays lie smoother.
Miss Finch
July 18, 2016 at 6:43 AMWhat would you recommend using to make the curves on the 1780s stay?
Unknown
October 11, 2016 at 2:10 AMThis comment has been removed by the author.
Heidi Smith
March 8, 2017 at 10:54 PMThis comment has been removed by the author.
Unknown
August 9, 2018 at 8:35 PMI’m making a pair of 1770 stays from this pattern. I plan to add the stomacher from the simplicity dress pattern. To be historically accurate, should I construct the stomacher as detailed for the dress/botice instructions or similar to the stays (I.e. attaching the outer fabric to the interlining, boning, attaching leather sound edges then attaching lining). Also, should the central boning of the stomacher be of the same boning in the corset or should a busk be used? Thanks.
Gabs
February 26, 2019 at 5:11 PMWhat is the best option for support a big bust?
ProLux Cleaning
April 30, 2019 at 12:43 PMTruly amazing! Was a pleasure watching the video!
Mathilde Sonne
September 28, 2020 at 9:36 AMHi! Why does the pattern show lacing at both front and the back? The stays that are shown in the picture for the Boning 2.0 video do not have the front lacing. Why is that? And is it possible to adjust the pattern to only back lacing as shown in the picture? 🙂
Janet
January 23, 2021 at 3:51 PMRoughly how much boning should we buy to make one pair of fully boned stays?