 |
| Me and Kristen at the ball – photo by Nevada Live Magazine |
I couple weekends ago I was all a-tussle finishing the evening bodice for my new purple 1860s gown. I intended to wear it to a local Civil War ball, and was happy to put the finishing touches on it a couple hours before leaving for the ball.
I didn’t take the easiest path on this bodice. I scaled up a gridded pattern from Period Costume for Stage & Screen: Patterns for Women’s Dress, 1800-1909 , using a new-to-me digitizing technique, and after a quick toile (maybe a bit *too* quick), I cut into my silk and stabilizing layer.
Well it all worked out in the end, despite fussing with the side seams and performing an impromptu nip-n-tuck on the back pieces. I stitched in some hand-sewn eyelets, and bound the bottom edge in self-fabric piping. At this point, unadorned, the bodice looked very bridesmaid, which influenced my decision to add sleeves (because I’ll avoid them if I can!). Again using Hunisett’s instructions, I mounted organza puffs on muslin bases and stitched them in.
 |
| The bodice base without sleeves or any boning int he front point. It looks so…modern. |
 |
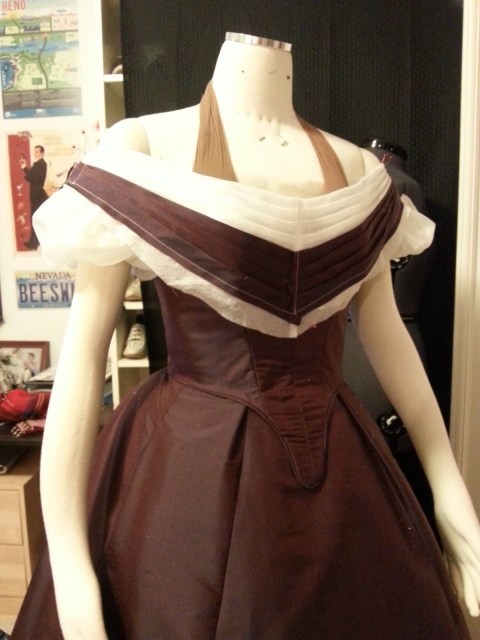
| The bodice with the sleeve puffs and the base pieces for the bertha pinned in place. Still no boning in the bodice. |
It’s amazing the effect this little detail had on de-bridesmaiding the design, but the bodice needed the big finale to truly look period – the bertha.
One invaluable tip I picked up from Hunisett and Janet Arnold both was to cut bias strips and lap them onto a base, to create the pleated look of the bertha. I found this method SO much easier than trying to pleat a piece to shape, and gleefully layered on bias strips in the silk and organza, followed by a super-shreddy strip of ruched silk, and some trickier-than-they-look finishing pieces to cover where the berthabits met on the center front and shoulders.
 |
| Layering bias strips of organza and silk. Note to self – change the friggin’ thread color next time, because that sh*t’s visible! |
 |
| The nearly-complete bertha pinned into place. My first base wasn’t big enough, so I added more organdy and kept layering until getting to the size I wanted |
Ginormous bows and bling finished it, and at least on the dress form the thing looked glamorous.
 |
| Day of the ball – adding black taffeta bows, big sparkly things, and planning jewelry for the evening. |
I wheezed a sigh of relief when the bodice fit my actual body like a glove, and everything stayed put, despite the incredibly low-cut design, and constricting shoulder (can I even call them that?) straps.
 |
| Photo by Willie P. |
 |
| Photo by Kristen – everything stayed put, thank goodness. |
 |
| Chatting with a gentleman I met at the dance. I need a bit more oomph in the skirt – elliptical shapes are a bit tricky to support. Photo by Nevada Live Magazine |
 |
| For hair I used several hair pieces and a wash-out mousse to color my own hair brown, so it would blend with the hairpieces. The tiara could use a better method of sticking to one’s head. Photo by Nevada Live Magazine |
 |
| Photo by Nevada Live Magazine |
Most importantly, I felt wonderful in the gown. I felt regal and glamorous and graceful, and I can’t wait to wear it again!


32 Comments
Porcelana
December 16, 2014 at 5:23 PMAh, amazing gown! The bodice looks perfect with all the bows and stuff. Last month I sewed a 1840s evening gown in the same colour, with black additions too 😀 But unfortunately I didn't manage with a the bodice. Too short, too lose, wrinkles everywhere omg, what a fail 😀
Lauren Stowell
December 16, 2014 at 7:38 PMThank you! Well, too short is difficult to fix, but too loose at least is workable – you can always take it in. 🙂 But "failing" is learning, so even if you didn't rework this one, the next time you'll fly through those difficult parts with ease 🙂
AuntieNan
December 17, 2014 at 4:05 PMHi, what a FAB project! As to too short bodices, a couple of costume fixes I've done over the years–lay in a few rows of self fabric bound piping at the waist. Or give the skirt an extra tall waistband, shaped to run up under the bodice. Or add a peplum in the self fabric. I dint have pix of any of these or I'd share. But it could rescue all your hard work,
Best for the season,
Nancy N
Lauren Stowell
December 17, 2014 at 8:06 PMThe extra rows of piping is a great idea!
Miss Brilliantine
December 16, 2014 at 5:46 PMBeautiful! I love the stockings too. Do you offer them in your shop?
Lauren Stowell
December 16, 2014 at 7:39 PMThank you! The stockings are some new openwork ones we're getting into the shop soon. 🙂
Esther
December 16, 2014 at 7:57 PMWow! That is an incredible, beautiful, amazing dress! Great job!! 🙂 It certainly is a humongous relief when the actual dress actually fits you…phew!
You look very regal and 1860s!!
Lauren Stowell
December 16, 2014 at 9:22 PMThank you! yes, the fitting can be tricky, especially with the off-the-shoulder styles. My dress form has arms that somehow match mine pretty closely, and thank goodness, otherwise I would have problems fitting this kind of bodice
The Lady Victoria
December 16, 2014 at 9:12 PMI'm not a fan of the 1860's, but I have a soft spot for blinged out berthas 😉
The colour is gorgeous, I like how it changes shades in different lights. I didn't know about the tying a ribbon to your shoe thing, I actually quite like the look!
Where did you get your fan from? The design and colours are super pretty
Lauren Stowell
December 16, 2014 at 9:22 PMThank you! I got my fan from Colonial Williamsburg. I bought it in one of the shops there, but I believe you can get them online too
KristenG
December 16, 2014 at 11:28 PMI think it's beautiful and very elegant. And I love that shade of purple:)
Lauren Stowell
December 17, 2014 at 8:06 PMThank you!
Anonymous
December 16, 2014 at 11:28 PMThe dress is just gorgeous! I love the color. Where did you get the gloves? I'm having trouble finding any that come up past the elbow!
Thanks 🙂
Lauren Stowell
December 17, 2014 at 12:02 AMThank you! The gloves were a gift and I believe they came from Sacramento Antiques Fair. They have the three buttons at the wrist, and are some kind of cotton, rather than kid. Try Etsy, too.
Caroline
December 17, 2014 at 2:29 AMThe gown is beautiful! The neckline and bertha are gorgeous! Very elegant 🙂
Lauren Stowell
December 17, 2014 at 8:06 PMThank you!
fixitfaerie
December 17, 2014 at 5:22 AMYour dress is beautiful and you look gorgeous in it!
Lauren Stowell
December 17, 2014 at 8:06 PMThanks!
MrsC (Maryanne)
December 17, 2014 at 6:23 AMWOW, this is fantabulous! The Mertha of all Berthas, I love them they are so romantic, and set the shoulders off so well. Glorious job, Lauren, well done!
Lauren Stowell
December 17, 2014 at 8:07 PMI didn't think I would like the bertha so much, but it really "makes" the bodice, I think. Without it it would look quite boring, really!
WKiss
December 17, 2014 at 2:47 PM"Note to self – change the friggin' thread color next time" – I use fabric markers. A lot.
Lauren Stowell
December 17, 2014 at 8:07 PMHahaha…I need to go and get some….
Hana - Marmota
December 17, 2014 at 5:04 PMOh, thank you for mentioning the bias pleat trick! I would like to venture into 1840s one day and that bit was puzzling me…
It turned out beautiful! The sleeves definitely finish it off nicely, tying in with the white section of the bertha; they were a good addition!
Lauren Stowell
December 17, 2014 at 8:08 PMOh my gosh it's SO much easier than the pleating. You'll be astonished. It takes a little time to cut all the bias strips, sure, but you make it back up in the time saved not fussing with the crazy pleats.
Black Tulip
December 17, 2014 at 11:56 PMSuch a beautiful gown. It's amazing how the sleeves and bertha transform it.
When you say "mounted organza puffs on muslin bases" – are the muslin bases cut to the same shape as the organza, or are they more of a tube shape?
Lauren Stowell
December 18, 2014 at 12:32 AMThank you! The muslin sleeve bases are tube shapes. The organza was quite springy, but if you did it with a softer draping fabric like voile, you might want to do a full lining to support the puffs.
MindLess
December 19, 2014 at 9:13 PMYou look dashing and I love the fabric so much! Such a rich and shimmery fabric, I'd love to get some for myself!
Crystal
December 19, 2014 at 11:52 PMGUH i cannot get over how gorgeous this is. You look like a queen!
Unknown
March 14, 2016 at 2:40 AMWhere did you get your tiara from? I'm looking for one for a Civil War ball that I will be going to in may.
Thank you!
Unknown
December 27, 2016 at 7:42 PMHi Lauren, I found this whilst researching ball gown bodices for a new project and I was wondering – how practical was the off the shoulder style to wear? I imagine it greatly reduces movement?
Lauren Stowell
December 27, 2016 at 8:37 PMHi Emma – Yes, I couldn't raise my arms! That being said, my straps are too low on this bodice. The whole thing is too low, so when I revise it I'm going to take the bertha off, take a couple tucks in the neckline to raise the shoulder straps, and then re-apply the bertha.
Unknown
December 27, 2016 at 9:19 PMThanks, I will take that into consideration when I draft the pattern for mine!